Over the last week I shipped so much that I lost count. A friend asked what he would need to do the same thing without becoming a developer or a part-time infrastructure engineer.
The answer was surprisingly short. You need a name people can visit, somewhere for the website to run, and a safe way for a coding agent to control that hosting. Once those pieces are connected, "build this and put it online" becomes a realistic instruction rather than wishful thinking.
This article is the bridge. It explains what a domain, DNS, nameservers, records, hosting, deployment, build, environments, SSL/TLS, CLI, API, MCP, authentication tokens, environment variables, logs, rollback and a custom domain actually mean — not as a glossary but as the order you encounter them when you ship something real.
The thesis is one sentence: agent-friendly vendors expose a straightforward CLI, MCP server or API with clear setup and authentication instructions, so your agent can do work that would otherwise require repeated manual clicks. A vendor can have an excellent dashboard and still be awkward for an agent. The useful test is whether it offers a documented credential, a documented way to act and a documented way to inspect what happened.
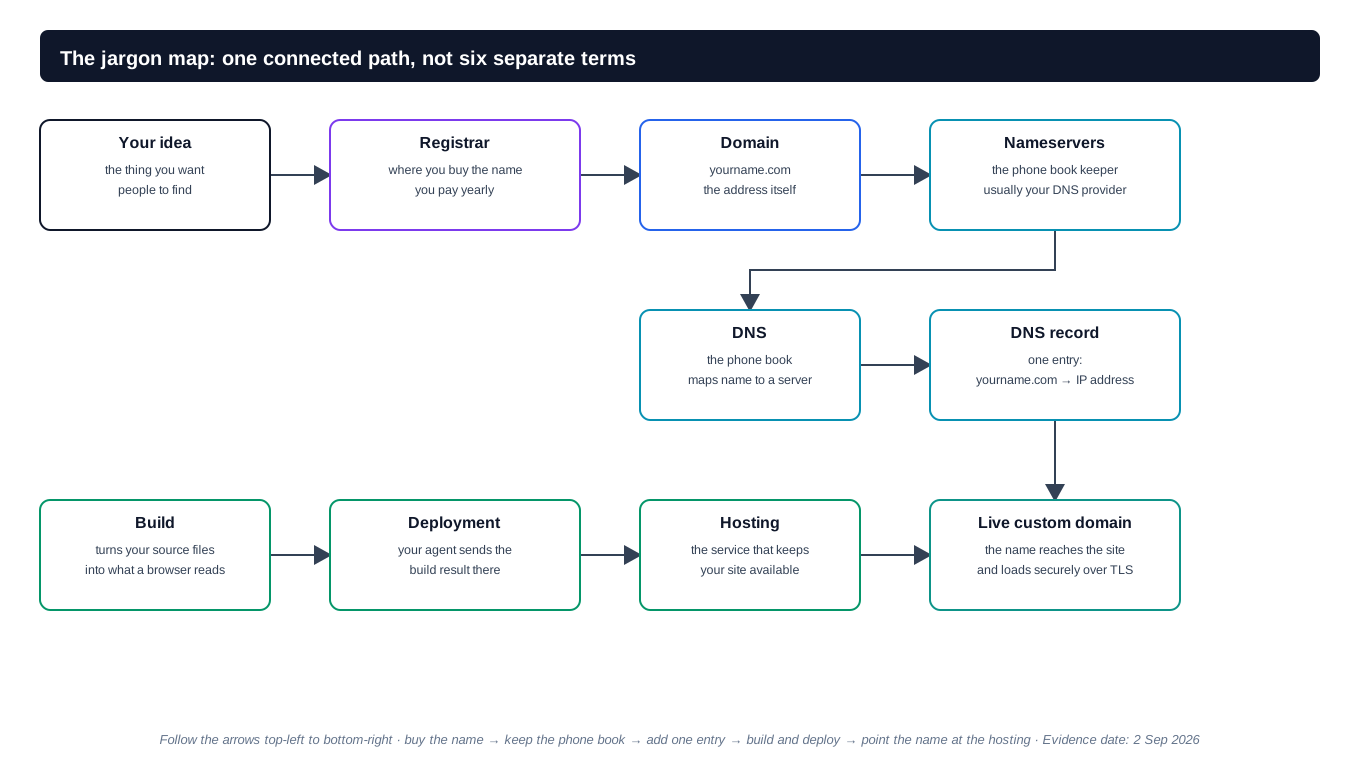
The jargon, in the order you meet it
- A domain is the human-readable name people type into a browser (
yourname.com). A registrar is where you buy and renew it — Cloudflare, Namecheap, Hover and many others sell domains. - DNS is the internet's address book. Nameservers identify the service that is authoritative for your domain's DNS. DNS records are the entries held by that service — for example, an
Arecord pointing to an IP address or aCNAMErecord pointing one hostname at another. - Hosting is the service that makes your site available on the internet. It might run your code on managed infrastructure such as Vercel, on a server such as Hetzner managed through Coolify, or on a runtime such as Cloudflare Workers.
- Deployment is the act of sending your built site to that hosting. A build is the step that turns your source files into what a browser reads. A production environment is what the public sees; a preview environment is a temporary copy the agent can deploy to first so you can check it looks right before it goes live.
- SSL/TLS is the technology behind the padlock in the browser. It encrypts traffic between the visitor and your hosting. Many managed hosts provision the certificate automatically after the custom domain is configured correctly.
- A custom domain is your domain pointed at the hosting you chose, instead of at a generic
yoursite.vercel.apporyoursite.pages.devURL.
That is the mental model. The rest of this article is the setup sequence, the security cautions, and the checklist that makes it repeatable.
Why "agent-friendly" matters more than which vendor you pick
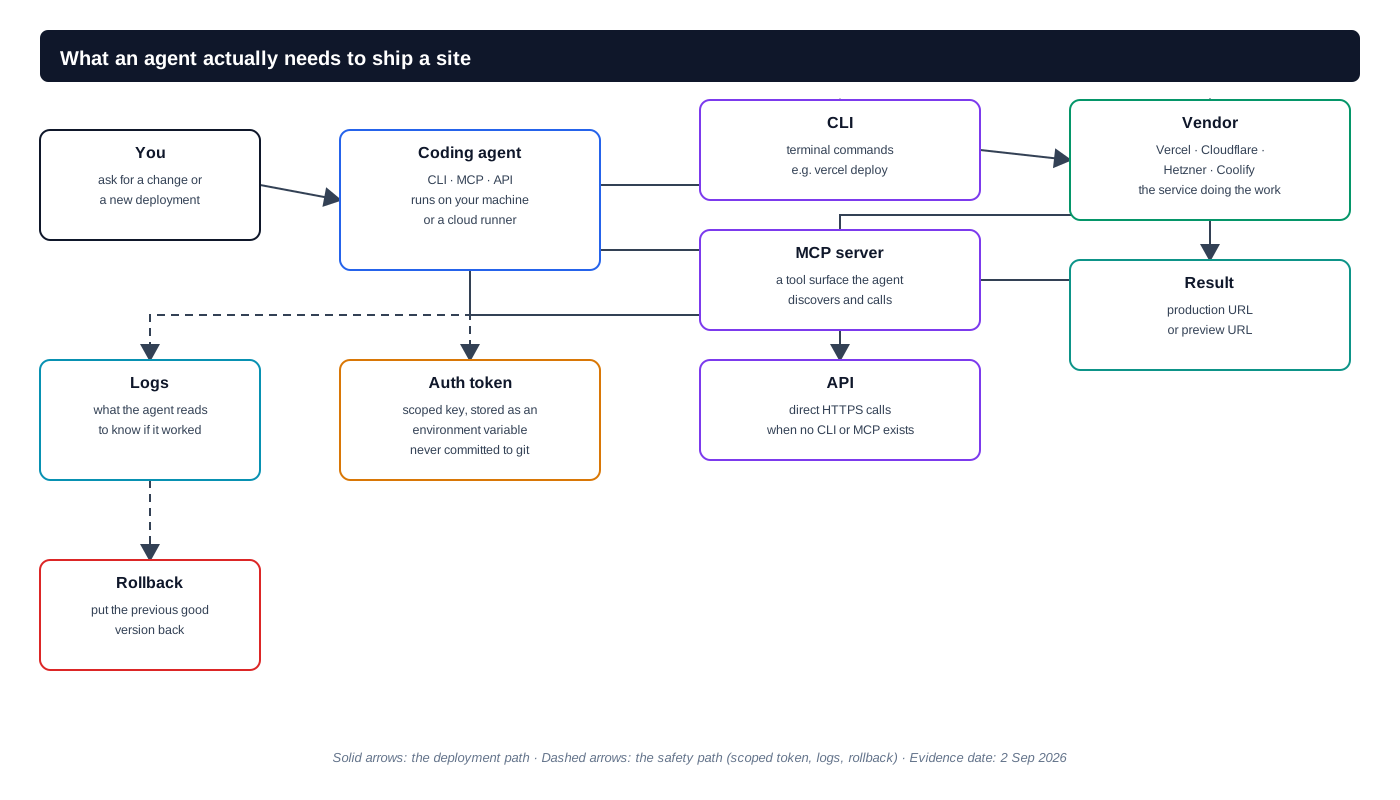
The choice of hosting matters less than whether you (or your agent) can actually use it. The test is concrete:
- Can you create a scoped authentication token from the vendor's dashboard or CLI?
- Does the vendor document a CLI, an MCP server, or an API that the agent can call?
- Can the agent inspect deployment status, logs and a rollback path afterwards?
If the answer to all three is yes, your agent can deploy, update, check logs and roll back. If the answer is no, you will end up doing the work by hand no matter how good the agent is.
Three examples from my own stack illustrate the range:
- Vercel is where this site is deployed. It has a CLI (
vercel), a documented REST API, and a hosted MCP server atmcp.vercel.com. The agent can deploy a preview, inspect logs and promote to production from a terminal. - Cloudflare is another deployment and DNS surface I use. Its
wranglerCLI deploys Workers and Pages, its API is documented, and it runs managed MCP servers for its own products. Its DNS service can hold the records that point a domain at Cloudflare or at another host. - Hetzner provides the server; Coolify provides the deployment layer on top of it. Coolify has a documented API, a CLI, and community MCP servers built on top of that API, so the agent can restart a container or check health without SSH-ing in manually.
None of these is a recommendation over the others. Netlify, Railway, Render, Fly.io, DigitalOcean and many other providers expose some combination of CLI, API, Git integration and deployment logs. They are different shapes of the same answer: give the agent a safe control surface and the work becomes automatable.
A practical setup sequence
The sequence below assumes you have nothing yet — no domain, no hosting, no token. It is written for the reader who has never done this before.
1. Buy a domain name
Pick a registrar, search for the name you want and buy it. Registrars differ in price, renewal terms, supported top-level domains and account controls, but the job is the same: they record that you control the name.
Some vendors expose domain APIs too, but buying a domain should still be a human approval point. Check the spelling, renewal price and account before money changes hands.
Short agent prompt for this stage:
Help me choose a domain name for <your idea>. Suggest three options, check they
are likely available, and tell me what to look for before I buy (renewal price,
top-level domain, registrar reputation).
Registrar references:
2. Choose hosting
Choose where the site will live. This is a trade-off between simplicity and control:
- A managed platform like Vercel handles build, SSL and CDN automatically. You push code; it deploys. Least to manage.
- A self-hosted stack (for example, a Hetzner server running Coolify) gives you more control and more responsibility. You own more of the server, networking, updates, backups and recovery story.
Both are valid. If you have never deployed before, start with the managed platform. You can move later.
Short agent prompt for this stage:
I have no hosting yet. Compare managed platforms (Vercel, Netlify, Cloudflare
Pages) with self-hosted stacks (Hetzner + Coolify) for a static site like mine.
Recommend one and explain why in plain English.
Host references:
- Vercel: deploy from the CLI
- Cloudflare: Wrangler commands for Workers
- Coolify documentation
- Coolify installation
- Netlify docs
- Railway docs
- Render API
- DigitalOcean App Platform
- GitHub Pages
- Fly.io docs
3. Get an authentication token
Log in to your hosting provider's dashboard. Find the section for API tokens, personal access tokens or CLI authentication. Create or authorise the narrowest credential that still allows the required deployment work. Avoid account-wide administrator access when a project-scoped credential will do.
Short agent prompt for this stage:
Walk me through creating the narrowest useful token on <my hosting provider>.
What scope do I need just to deploy this project? Tell me what to click and
what to avoid.
Token references:
4. Store the credential outside the code
Do not paste the token into the source code, a prompt, a screenshot or git history. Prefer the vendor CLI's secure login flow, your operating system's credential store, a secret manager, or encrypted deployment settings.
An environment variable is a value supplied to a program when it runs rather than written into the program's source files. Deployment systems commonly inject secrets this way. The important point is that the credential stays outside the files the agent edits and commits.
macOS Terminal (zsh)
# Run once, in Terminal. This sets the variable only for this session.
export VERCEL_TOKEN=your-token-here

# To persist it across sessions, add the same line to ~/.zshrc
echo 'export VERCEL_TOKEN=your-token-here' >> ~/.zshrc
What this does: export VERCEL_TOKEN=your-token-here creates an environment variable called VERCEL_TOKEN holding your token. The agent (or any process it spawns) can read it as $VERCEL_TOKEN. The echo … >> ~/.zshrc line appends the export to your shell startup file so it survives closing the terminal.
Session vs persistence: the bare export lasts only until you close that terminal. The ~/.zshrc line makes it permanent.
How the agent reads it: the vendor CLI (for example vercel) automatically picks up VERCEL_TOKEN from the environment. You never paste the token into a prompt.
Windows PowerShell
# Run once, in PowerShell. This sets the variable only for this session.
$env:VERCEL_TOKEN = "your-token-here"

# To persist it for your user account across sessions:
[Environment]::SetEnvironmentVariable("VERCEL_TOKEN", "your-token-here", "User")
What this does: $env:VERCEL_TOKEN = "…" creates the variable for the current PowerShell session. SetEnvironmentVariable writes it to the Windows registry so it survives reopening PowerShell. PowerShell's documentation on environment variables covers both forms.
Session vs persistence: the first line disappears when the window closes. The second persists until you change or remove it.
Windows Command Prompt (cmd.exe)
:: Run once, in cmd.exe. This sets the variable only for this session.
set VERCEL_TOKEN=your-token-here

:: To persist it permanently for your user account:
setx VERCEL_TOKEN "your-token-here"
What this does: set VERCEL_TOKEN=… creates the variable for the current cmd.exe session. Microsoft's documentation for set and setx explains both. setx writes it to the registry so it survives reopening cmd.exe — but note that setx does not make it available in the window where you just ran it; you must open a new window.
Session vs persistence: the bare set lasts until the window closes. setx persists and only takes effect in a new window.
How to avoid leaking secrets
- Never paste the raw token into a prompt or chat. The agent reads it from the environment variable.
- Never echo it in a screenshot or a code block that gets committed.
- Never add it to
.envfiles that are committed. If the vendor uses a.envfile, add it to.gitignorefirst. - If you think it leaked, rotate it immediately. Most vendors make this a one-click action.
- Prefer the vendor's own secure login flow when it exists (for example
vercel login). A CLI-managed token never touches a file you can edit.
5. Connect the agent to the vendor
The agent needs a way to call the vendor. This is where "agent-friendly" becomes concrete:
- CLI route: the agent runs the vendor's terminal commands after the CLI has been authenticated. This is simple and widely supported.
- MCP route: the agent connects to the vendor's MCP server and discovers purpose-built tools such as deployment and log actions.
- API route: the agent makes HTTPS requests directly to the vendor's documented REST API. This is the fallback when no CLI or MCP server exists.
For a first deployment, the CLI route is usually the simplest. The agent can read the vendor's getting-started docs, install the CLI, and run the deploy command.
Short agent prompt for this stage:
Connect to <my hosting provider>. Install the CLI if needed, confirm I have a
token in the environment, and report what account and project it can see.
Do not deploy anything yet.
MCP references:
6. Connect the domain to the hosting
This is the DNS step. You need to tell the phone book where to find your site.
There are two common ways to do this:
- Change the nameservers. This delegates the domain's DNS to another provider, which then becomes the place where you manage all the records.
- Keep the current nameservers and change individual records. Add the
A,AAAA,CNAMEor other record your hosting provider asks for.
Neither method is inherently better. Use the hosting provider's exact instructions, especially for the root domain and www. Do not replace nameservers casually if the domain already handles email or other services, because those records need to move as well.
Vercel, Cloudflare and Coolify all give you the exact value to enter. Add it. DNS propagation can take minutes to hours.
Short agent prompt for this stage:
I want my domain <yourname.com> to point at <my hosting>. Tell me which DNS
records or nameservers to add, where to add them, and how to check it worked.
Do not change anything yet.
DNS and nameserver references:
- Cloudflare: what DNS is and how authoritative nameservers work
- Cloudflare: DNS record types
- Cloudflare: add DNS records
- Vercel: add a custom domain
- Vercel: nameservers
- Hetzner DNS console
- Hetzner: delegate a zone to Hetzner
- Hetzner: add records
- Hetzner: nameserver FAQ
7. Deploy
Now the agent does the work. For a first deployment, ask the agent to:
- Run a build locally to confirm it works.
- Deploy to a preview environment first — a temporary URL the agent can check.
- If the preview looks right, promote to production.
On Vercel, later CLI deployments without --prod normally create previews and vercel deploy --prod creates a production deployment; Vercel documents that a new project's first deployment is a special case and is production. Cloudflare uses wrangler deploy for Workers and wrangler pages deploy for a direct Pages upload. Coolify can trigger deployments through its CLI or API.
The preview-then-production pattern is the single most useful safety habit in this whole article. A mistake caught on a preview URL costs nothing. A mistake on production is public.
Short agent prompt for this stage:
Deploy a preview of this project. Give me the preview URL. Do not promote to
production until I check it and say so.
8. Check the result
Ask the agent to read the deployment logs once. Did the build succeed? Did the site deploy to the expected environment? Can you open the URL in a browser and see your site?
If the answer is yes, you are done. If not, the logs tell you (and the agent) what went wrong.
You do not need to ask this after every deployment. A short AGENTS.md rule (below) makes verification the default so the agent does it without being asked each time.
AGENTS.md: stop repeating yourself
An AGENTS.md file is a plain-text instruction file that lives in your repository. Coding agents read it automatically at the start of every task. It is the right place for rules you would otherwise repeat in every prompt.
Think of it as the standing orders for the agent working in this project. Every time the agent opens the repo, those orders are already in context.
A concise example for a personal website project:
# AGENTS.md — project rules

## Deploys
- Always deploy a preview first.
- Never promote to production without showing the preview URL and asking.
- Production deploys go through the vendor CLI with the scoped token in the
  environment. Never paste the token.

## Verification
- After any deploy, read the logs once and confirm the build succeeded.
- Open the preview or production URL and confirm the site loads.
- Check navigation, links and forms if the change touched them.

## Secrets
- Never commit tokens, API keys or passwords.
- If a secret appears in a diff, stop and rotate it immediately.

## Rollback
- If production breaks, roll back to the previous good deployment first.
- Then report what happened and what you did.

## Style
- Keep prose human. No bullet-point-only sections.
- Do not add decorative figures without a teaching objective.
The file should be short. If it grows into a manual, agents will skim it and you will trust it less. Ten to twenty lines of real rules beat fifty lines of aspirations.
Once AGENTS.md is in place, your per-task prompt shrinks. Instead of "deploy a preview, check the logs, don't touch production, and roll back if something breaks", you write "ship this change" and the rules carry the rest.
Security cautions you should not skip
Never commit tokens
The most common mistake is putting a token in a file the agent edits and then committing it. Git history is forever. Even if you delete the token from the current file, it remains in the commit history.
Prevention: store tokens in environment variables or a secret manager. The agent should never see the raw token value in a file it can edit.
Scope tokens narrowly
A token that can do everything is a bigger problem than a token limited to one project and the actions the agent needs. If the token leaks, the damage is limited to what the token can reach. Prefer project-scoped deployment access over full account administration whenever the vendor offers it.
Rotate if in doubt
If a token was accidentally committed, logged in plain text, or shared in a screenshot, rotate it immediately. Most vendors make this a one-click action.
Preview before production
The preview environment is your safety net. The agent should never deploy straight to production on a first run of a new change. Deploy to preview, check it, then promote.
Verification and rollback
A deployment that works is not the same as a deployment that is safe to keep.
Verify
After a deployment, ask the agent to:
- Read the deployment logs for errors or warnings.
- Open the deployed URL and confirm the site loads.
- If the change touched navigation, links or forms, check those specifically.
On Vercel, the vercel logs command or the deployment URL itself shows this. On Coolify, the API returns deployment status and logs. On Cloudflare, wrangler tail streams live logs.
Roll back
Each of these platforms exposes a recovery route, although the exact mechanism differs:
- Vercel supports rolling back production to a previous deployment through its dashboard and CLI.
- Coolify can redeploy a known good commit or image through its deployment controls.
- Cloudflare Workers supports version rollback through its dashboard and Wrangler.
Treat rollback as part of the normal loop: deploy, check, then keep the release or put the previous good version back. The agent can do all three.
Short agent prompt for rollback:
Production is broken. Roll back to the previous good deployment, confirm the
site is working again, then tell me what you did and what caused it.
A checklist the reader can follow
Before your first deployment:
- Domain purchased from a registrar
- Hosting provider chosen and account created
- Authentication token created with the narrowest useful scope
- Credential stored in a secret store or environment variable, not in code
- Agent connected to the vendor via CLI, MCP or API
- DNS record added pointing the domain at the hosting
- Local build tested and passing
For each deployment after that:
- Change built and tested locally first
- Deployed to preview, not straight to production
- Preview URL opened and checked in a browser
- Deployment logs read for errors
- Promoted to production only after preview passes
- Previous deployment noted as the rollback target
One deployment snapshot
The numbers in this section are a dated snapshot, not a lifetime total or a marketing claim. They were checked on 2 September 2026 using the Vercel CLI.
Over the seven-day window ending on that date, vercel ls --all across six pages of results showed 113 deployments: 111 in READY state, 56 of those READY on production, and 2 in ERROR state. vercel projects ls listed 20 current projects.
That means roughly half of the READY deployments in that window went to production and roughly half were non-production deployments — the shape you would expect when changes are checked before release. The two errors also remained visible in the deployment history instead of disappearing into memory.
These numbers say nothing about Cloudflare or Coolify volume, which are tracked through different tools and are not comparable in this snapshot. They also say nothing about cost or traffic. They are here because a real number, with a date attached, is more useful than a vague claim about "lots of deploys."
What "agent-friendly" means in practice
The label is a test, not a badge. It means the vendor gives you:
- a documented way to authenticate (a token, an API key, a service account)
- a documented way to act (a CLI command, an MCP tool, an API endpoint)
- a documented way to observe (logs, deployment status, health checks)
If all three are present, your agent can do the work. If any one is missing, you will end up doing it by hand.
You do not need to become a DevOps engineer before you publish a useful website. Pick vendors your agent can operate, keep its credentials outside the code, put the operational rules into AGENTS.md, and insist on a preview, logs and a rollback route.
Once those pieces are ready, the instruction can be as ordinary as: "Build this, deploy a preview, check it in a browser, and put it on my domain if it passes."
Useful official guides
- Cloudflare: what DNS is and how authoritative nameservers work
- Cloudflare: Wrangler commands for Workers
- Cloudflare: API tokens (create)
- Cloudflare: DNS record types
- Cloudflare: full DNS zone setup
- Vercel: deploy a project from the CLI
- Vercel: preview and production environments
- Vercel: add and configure a custom domain
- Vercel: nameservers
- Vercel account tokens
- Vercel MCP
- Coolify documentation
- Coolify API reference
- Hetzner Cloud API documentation
- Hetzner DNS console
- Namecheap: how to change DNS for a domain
- PowerShell: about environment variables
- cmd.exe: set
- cmd.exe: setx
If the words git, branch and pull request are also new, start with Git workflow for beginners. For a concrete self-hosted example, see Building a two-agent personal cloud on Coolify and Hetzner.